Your ear anatomy is as unique as your fingerprint, and for an industrial piercing, it is the ultimate gatekeeper. You likely already recognize that this striking double-perforation is a premier style statement. However, you might also feel a lingering anxiety about whether your ear ridge can safely support the jewelry without the risk of rejection. It is a commitment to biological architecture that requires patience, discipline, and a deep respect for your body's natural limits.
We understand these concerns because we prioritize your long-term wellness over fleeting trends. This guide empowers you to master the complexities of the 12-month healing journey with professional insights on anatomy and aftercare. You will learn how to identify the right structural requirements, manage the delicate recovery phases, and select the finest industrial barbells for a healthy, sophisticated look. Our goal is to provide the clinical precision and nurturing care you need to navigate this process safely. From the initial sting to the final healed result, we act as your supportive specialist in the world of aesthetic refinement.
Key Takeaways
- Verify your anatomy before proceeding. A prominent helix rim and flat scapha are essential structural requirements for a successful industrial piercing.
- Prepare for a 12-month recovery journey. Healing two distinct cartilage points simultaneously requires disciplined patience and a long-term commitment to wellness.
- Prioritize purity in your aftercare routine. Utilize sterile saline spray and the "Leave It The Hell Alone" method to maintain a stable, irritation-free environment.
- Choose the correct hardware for stability. Learn why 14G implant-grade titanium is the professional standard for minimizing rejection and ensuring dermatological safety.
- Manage complications with precision. Understand how to use targeted treatment oils to soothe irritation and address the early signs of piercing bumps.
Understanding the Industrial Piercing: More Than Just a Barbell
An Industrial piercing represents a masterclass in ear curation. It is not merely a single puncture. It is a dual-point cartilage connection that bridges the upper ear with a single piece of jewelry. While many in the United Kingdom and Australia refer to this as a scaffold piercing, the term industrial has become the global standard for this bold statement. This piercing appeals to those who value symmetry, strength, and architectural beauty. It is bold. It is structured. It is timeless.
We approach this procedure with a philosophy of biological respect. You aren't just wearing jewelry; you are managing a complex healing environment. Success requires clinical precision, high-quality industrial barbells, and an unwavering commitment to safety. Our role is to act as your supportive specialist, ensuring your journey toward self-expression is grounded in health. We prioritize the integrity of your skin over fleeting trends, focusing on long-term wellness and aesthetic refinement.
The Anatomy of a Classic Industrial
The traditional placement links the forward helix to the outer helix across the top of the ear. A straight barbell is the necessary choice for initial healing to ensure the two wounds align perfectly without putting uneven pressure on the cartilage. An industrial piercing is a strategic alignment of two independent cartilage wounds. By using a single bar, the piercer creates a tension that requires perfect execution and high-polish, implant-grade materials. This standard setup provides a clean, high-end look that serves as the foundation for any curated ear.
Modern Variations and Creative Placements
Innovation has expanded the definition of this classic industrial piercing. Vertical industrials offer a dramatic alternative by connecting the conch to the helix in a top-to-bottom orientation. For those seeking advanced ear projects, multi-point industrials utilize three or more connection points for a truly custom aesthetic. If your ear shape doesn't support a traditional bar, floating industrials use delicate chains or specialized hardware to bypass the flat of the ear. These variations allow for personal growth and creativity. They provide solutions for different ear shapes, ensure safety, and support your unique style goals.
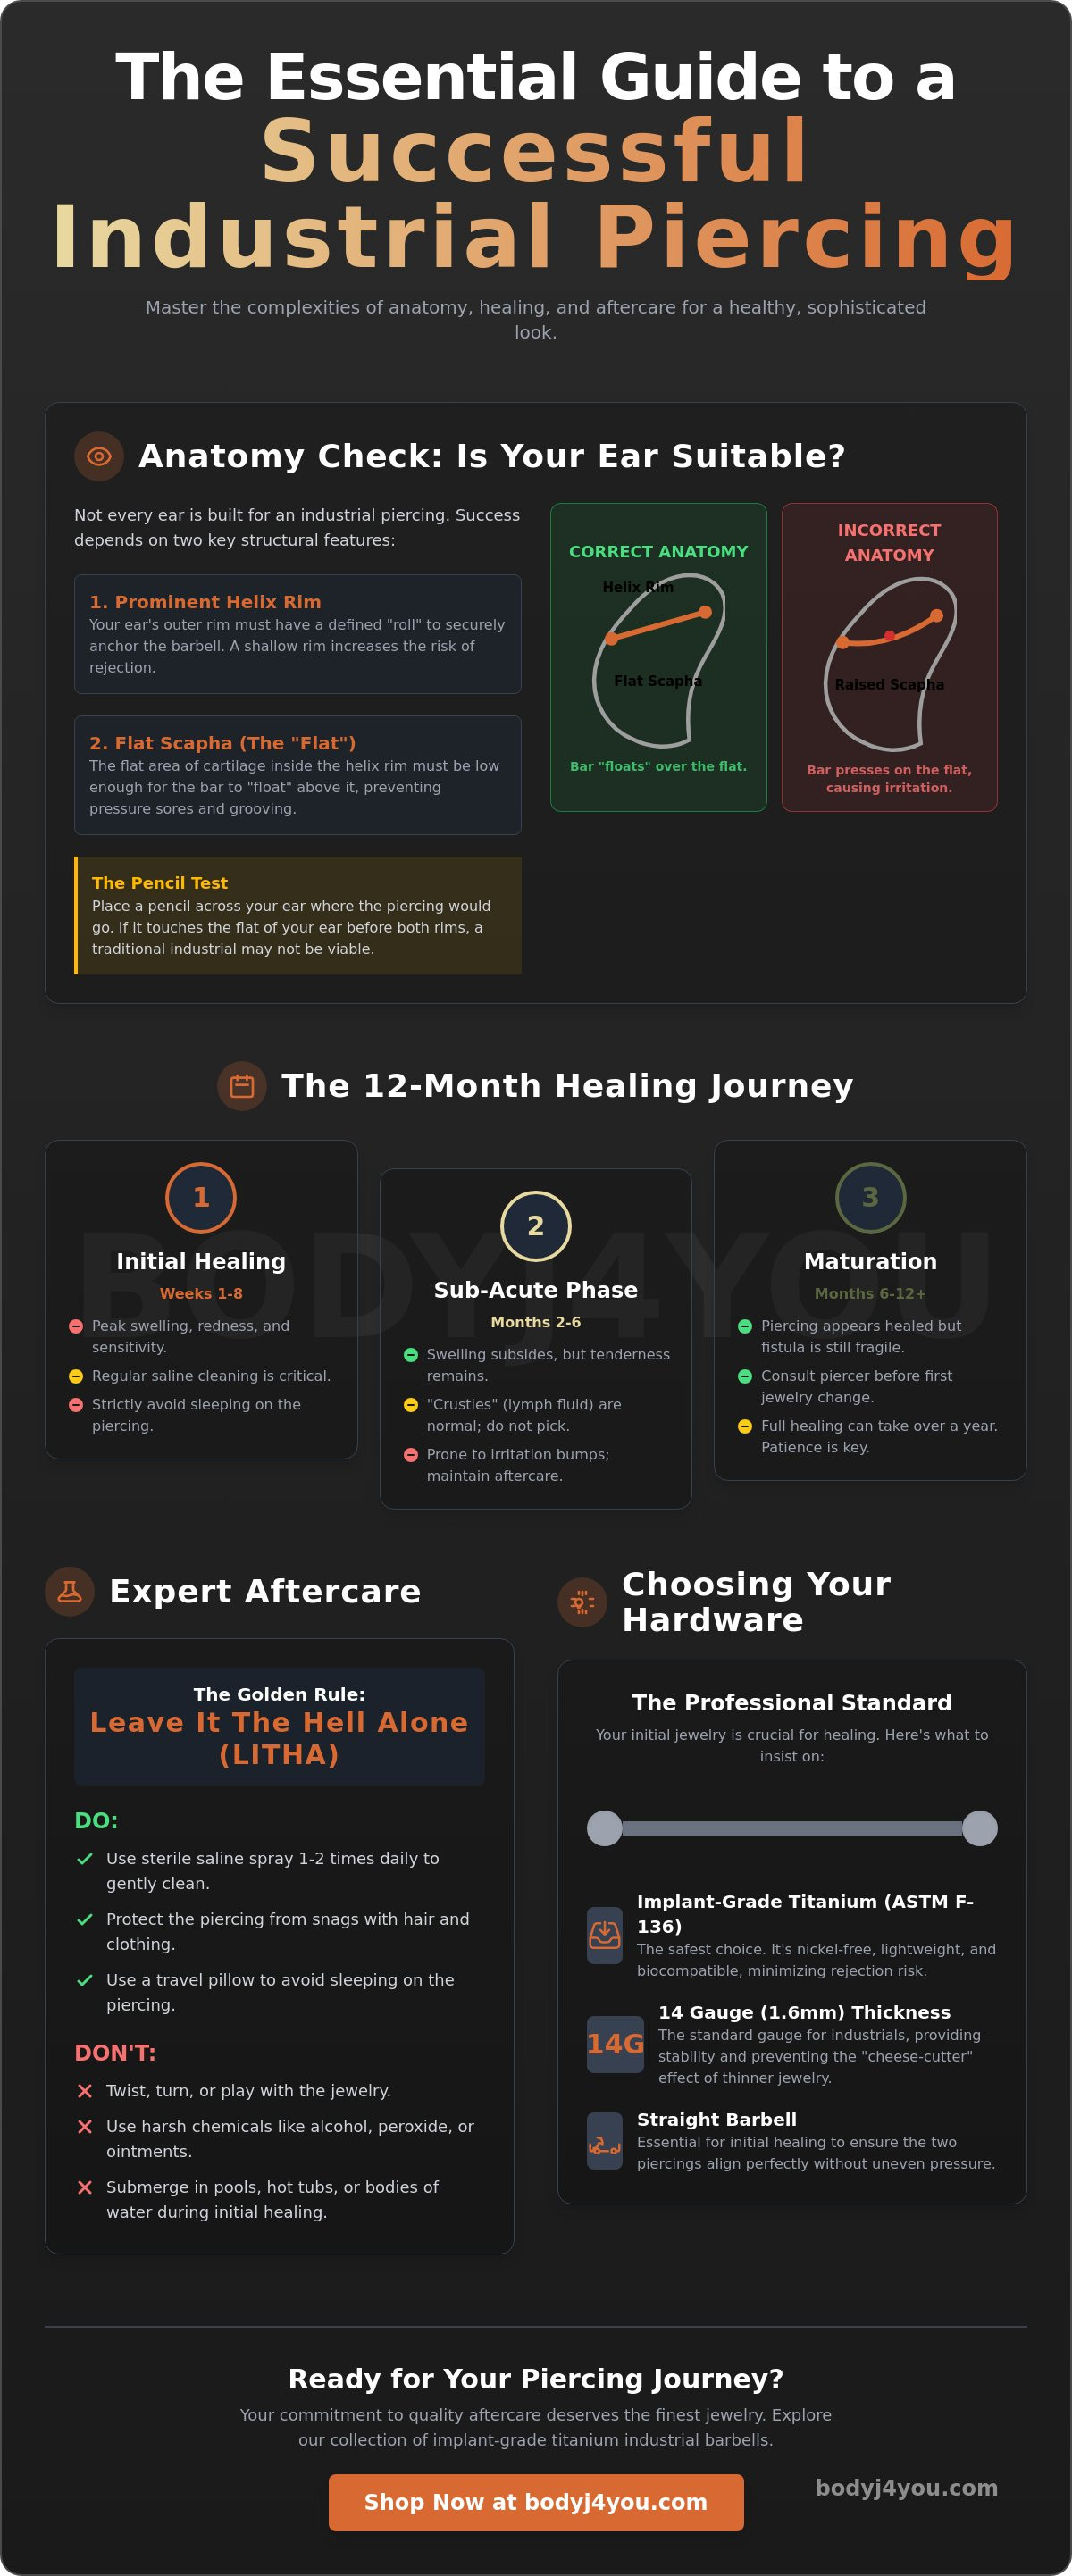
The Anatomy Check: Is Your Ear Built for an Industrial?
Not every ear is a biological canvas for an industrial piercing. This procedure requires a specific architectural landscape to succeed. The most critical factor is the "flat" of your ear, technically known as the scapha. If this area is raised or prominent, a straight bar will press directly against the skin. This constant friction leads to pressure sores, chronic irritation, and eventually, a permanent indent in the cartilage called grooving. The jewelry must float. It must be clear. It must be stable.
Your helix rim serves as the foundation for the entire project. It needs a defined "roll" to securely house the entry and exit points of the jewelry. Without a deep enough rim, the 14-gauge bar sits too shallow, which significantly increases the risk of migration or rejection. If your anatomy is borderline, even the highest quality industrial barbells cannot prevent the body from pushing the jewelry out. We prioritize your long-term safety over a temporary aesthetic, ensuring your journey toward self-expression is grounded in physical reality.
The Scapha Test
You can perform a preliminary check at home using the pencil test. Hold a straight pencil across the top of your ear, resting it on the forward and outer helix rims. If the pencil touches the middle portion of your ear before it rests firmly on both edges, your anatomy likely won't support a straight bar. Ignoring this physical constraint leads to inevitable piercing failure. It is a matter of biology. It is a matter of health. It is a matter of integrity.
When the bar touches the scapha, it creates localized tissue pressure. Over time, this can lead to "grooving," where the bar literally sinks into the cartilage. This is not just a cosmetic concern; it is a sign of tissue distress that can lead to permanent deformity. By respecting your ear's natural shape, you avoid the anxiety of long-term healing bumps and rejection.
Consulting a Professional Piercer
An in-person assessment is non-negotiable for an industrial piercing. Digital photos often flatten the ear's depth, making it impossible to judge the scapha's height accurately. Ask your specialist about their experience with complex placements and request to see their portfolio of healed work. A reputable professional will be honest if your anatomy isn't suitable. If a traditional bar isn't an option, they may suggest a "floating" industrial or a custom-bent piece. Following Expert aftercare guidance is only effective if the initial placement is anatomically sound. Your health is the priority, and a professional consultation ensures your piercing is built to last.
The 12-Month Journey: Pain, Healing Phases, and Mental Prep
An industrial piercing is a marathon, not a sprint. It requires a level of patience that single-point piercings simply don't demand. When assessing the pain scale, expect a sensation that's more intense than a standard helix. Because the needle passes through two distinct areas of cartilage in one sitting, the nervous system receives a double dose of stimuli. This makes it significantly more demanding than a daith piercing or a single lobe procedure. It is a bold choice for a bold individual.
The "Double Trouble" effect is the primary reason for the extended 12-month timeline. In a traditional setup, the two wounds are linked by a rigid 14-gauge bar. If you snag one end of the jewelry, the physical tension is immediately transferred to the other side. This creates a unique mechanical stress that can delay fistula maturation. You must prepare for a recovery that lasts a full year. We prioritize your safety. We value your patience. We support your transformation.
Mental preparation is your strongest tool. There will be a "false finish" around month four where the skin looks calm and the redness fades. Don't be fooled. The internal tissue is still fragile and far from fully stable. Prematurely changing jewelry or neglecting your routine during this phase often leads to the sudden appearance of irritation bumps. Stay disciplined until the 12-month mark to ensure the structural integrity of your curation.
Phase 1: The Inflammatory Stage (Weeks 1-4)
Expect localized heat, throbbing, and significant redness during the first 72 hours. Your piercer should use a longer barbell than necessary to provide space for this inevitable expansion. Initial swelling is the body's protective response, not a sign of infection. During these first four weeks, the goal is stabilization. Avoid touching the area entirely. Let the body's natural defense mechanisms begin the work of sealing the new channels without interference.
Phase 2: The Long Haul (Months 2-9)
This is the stage where "crusties" or lymph fluid will accumulate around the exit points. Never pick at these with your fingernails, as this introduces bacteria and causes micro-tears in the healing tissue. Sleeping on the piercing is the most common cause of "tension bumps" or migration. A travel pillow is your best friend during this stage. By placing your ear in the center hole, you eliminate the pressure that shifts the bar and irritates the cartilage. Consistency is the foundation of a successful heal.
Expert Aftercare: Protecting Your Investment
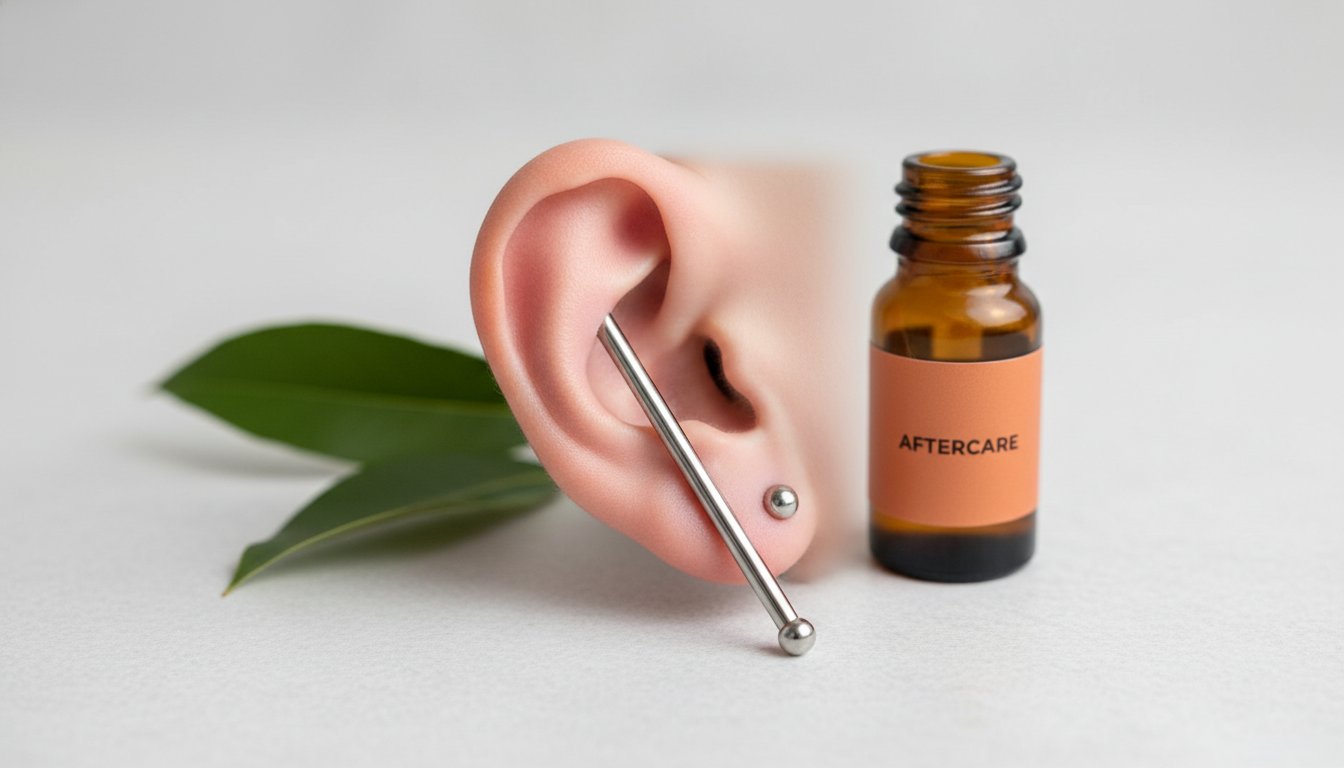
Aftercare is not a suggestion. It is a biological necessity. To ensure the longevity of your industrial piercing, you must adopt the LITHA method: Leave It The Hell Alone. This philosophy respects the body's natural ability to repair itself without the interference of harsh chemicals or physical trauma. Your role is that of a protective guardian. You provide the environment. Your body provides the healing. We provide the tools for success.
Sterile saline is the only acceptable cleaning agent for a fresh wound. Avoid DIY salt mixtures, which are often non-sterile and improperly balanced, leading to tissue dehydration. Purity. Safety. Efficacy. These are the standards your skin deserves. Additionally, you must avoid the "swimming pool trap" for at least 8 weeks. Submerging your ear in standing water, whether in a pool, lake, or hot tub, introduces a cocktail of bacteria and chemicals that can compromise the stability of your healing cartilage. Keep it dry. Keep it clean. Keep it safe.
The Daily Cleaning Routine
Consistency is the foundation of dermatological health. We recommend misting the entry and exit points with a high-quality Saline Piercing Aftercare Spray twice daily. This removes debris without the need for physical contact. The "No-Touch" rule is absolute. Rotating the jewelry is a myth of the past that only serves to tear the fragile new skin forming inside the channel. For hard-to-reach areas behind the helix rim, utilize specialized Piercing Cleaning Swabs to gently clear lymph fluid without disturbing the bar's alignment.
Troubleshooting Bumps and Irritation
Irritation is common, but infection is a medical matter. If you experience localized swelling and redness, it is likely a response to minor trauma or snagging. However, if you notice persistent heat, green discharge, or red streaks, consult a professional immediately. For many, the greatest anxiety involves the development of small, raised nodules. Learning how to get rid of piercing bump symptoms early can save your aesthetic project. Our targeted Piercing Bump Treatment Oil is designed to soothe these areas once the initial inflammatory phase has passed.
Once the fistula is stable, typically around month six, you may incorporate natural extracts like Jojoba oil or Rosehip oil to maintain skin elasticity. These ingredients support tissue integrity and prevent the dryness that leads to cracking. Finally, remember to visit your specialist for a "downsize." Swapping to a shorter bar once swelling subsides reduces movement and prevents the friction that causes long-term irritation. Invest in your healing journey by choosing our premium aftercare essentials today.
Choosing Your First Industrial Barbell: Materials and Measurements
The jewelry you choose is the architectural foundation of your curation. It is the bridge between aesthetic ambition and biological reality. For a successful industrial piercing, material purity is not a luxury; it is a clinical requirement. Implant Grade Titanium (Ti-6Al-4V ELI) remains the undisputed gold standard for initial healing. It is biocompatible. It is nickel-free. It is exceptionally lightweight. Unlike standard surgical steel, which may contain trace amounts of irritants, titanium supports the body's natural recovery without triggering allergic responses.
Stability is the next pillar of your success. Most professional piercers utilize a 14-gauge (1.6mm) barbell for this procedure. This thickness provides the structural integrity needed to resist the physical tension between two cartilage points. While 16-gauge (1.2mm) options exist for smaller anatomy, thinner bars are more prone to the "cheese-wire effect," where the jewelry slowly migrates through the tissue. We prioritize your long-term wellness by recommending the standard 14G thickness for maximum stability and safety.
Precision in engineering matters. Internal threading is a non-negotiable feature for any high-quality jewelry change. In this design, the threading is on the removable end, while the bar itself remains smooth. This ensures that when the jewelry passes through your delicate fistula, no jagged edges cause micro-tears or irritation. Protection. Precision. Purity. These are the markers of professional-grade hardware.
Measuring for the Perfect Fit
While 38mm is the industry standard for industrial barbells, "one size fits all" is a dangerous myth. Every ear has a unique width and ridge depth. A bar that is too short creates constant compression on the helix rims, which can lead to tissue necrosis or permanent scarring. Conversely, a bar that is too long is prone to snagging on hair or clothing, causing unnecessary trauma. You must measure the exact distance between your piercing holes to ensure a snug, healthy fit that allows for just enough movement to clean the area effectively.
Transitioning to Fashion Jewelry
Patience is the final ingredient in your styling journey. You must wait a minimum of 9 months before attempting an independent jewelry swap. Even if the skin looks calm, the internal cartilage requires this time to fully stabilize. When you are ready to transition, choose lightweight designs to avoid cartilage fatigue. Heavy or overly ornate pieces can pull on the holes, leading to late-stage irritation bumps. Ready to style your heal? Explore our curated collection of industrial barbells and find the perfect balance of safety and self-expression.
Master Your Aesthetic Journey
An industrial piercing is a bold fusion of biology and personal style. It requires more than just an appreciation for the aesthetic. You must respect your unique ear anatomy, commit to a disciplined 12-month healing phase, and prioritize the purity of your materials. Success is found in the precision of your fit. It's found in the consistency of your routine. It's found in the quality of your hardware.
As your supportive specialist, we bring over 20 years of industry expertise to your recovery process. We offer a US-manufactured aftercare line and high-quality implant-grade materials designed to protect your physical integrity. You deserve a curation that's safe, stable, and stunning. Trust in our heritage of quality control and regulatory trust to guide your self-expression. We're here to ensure your journey toward a perfectly curated ear is a testament to your patience and vision.
Shop Premium Industrial Barbells & Aftercare
Stay disciplined, stay informed, and enjoy your transformation.
Frequently Asked Questions
How much does an industrial piercing hurt on a scale of 1-10?
Most individuals report the pain of an industrial piercing as a 5 to 7 on a scale of 10. This sensation is typically more intense than a single helix puncture because the procedure involves two distinct cartilage perforations in one session. The initial sting is brief, but you may experience a dull, throbbing ache for several days afterward. Mental preparation and steady breathing are your best tools for managing this temporary discomfort.
Can I get an industrial piercing if my ear is flat?
A traditional industrial requires a defined helix rim and a recessed scapha to be successful. If the "flat" part of your ear is prominent, a straight bar will rest against the skin, causing chronic irritation or permanent cartilage damage. In these cases, a custom-bent bar or a floating industrial may be a safer alternative. Consulting a professional for an in-person anatomy assessment is the only way to ensure your ear can support the jewelry.
Why is my industrial piercing still crusty after 6 months?
It is completely normal for an industrial piercing to produce "crusties" or lymph fluid even 6 months into the journey. Cartilage is avascular, meaning it heals from the outside in, and the 12-month timeline is a standard biological expectation. This fluid is a sign that your body is still actively building the internal fistula. Continue using a saline spray and avoid picking at the area to prevent micro-tears and secondary irritation.
What should I do if my industrial piercing gets a bump?
If you notice a raised nodule, first identify the source of the irritation, such as sleeping on the ear or using harsh chemicals. Ensure your jewelry is implant-grade titanium and that the bar is the correct length for your anatomy. You can gently apply a specialized Piercing Bump Treatment Oil once the wound is stable to soothe the tissue. Consistency in your routine and the LITHA method are essential for resolving these common setbacks.
Can I wear headphones with a new industrial piercing?
You should avoid wearing over-ear headphones for the entire 6 to 12-month healing period. These devices apply direct pressure to the jewelry, which can shift the bar's alignment and cause painful tension bumps. They also trap heat and moisture, creating a breeding ground for bacteria near the open wounds. Earbuds are a safer alternative, provided they don't touch the forward helix or the jewelry itself during use.
When can I change my industrial bar for a shorter one?
You can typically change your initial bar for a shorter "downsized" version between 4 and 8 weeks after the procedure. This timing depends entirely on when your initial inflammatory swelling has completely subsided. A shorter bar is critical because it reduces the "seesaw" movement that irritates the cartilage. Always have a professional perform this first swap to ensure the new jewelry is sterile and properly fitted to your stabilized anatomy.
Is surgical steel or titanium better for a new industrial?
Implant-grade titanium is the superior choice for a new industrial due to its biocompatibility and lack of nickel. While high-quality surgical steel is a common option, titanium is lighter and less likely to cause a dermatological reaction in sensitive individuals. We prioritize your long-term wellness by recommending Ti-6Al-4V ELI as the gold standard for initial jewelry. This material choice provides the safety, stability, and purity required for a complex cartilage heal.
How do I know if my industrial piercing is rejecting?
Signs of rejection include the skin over the bar becoming thinner, the jewelry becoming visible through the tissue, or the holes physically moving closer together. You might also notice persistent redness and clear fluid that doesn't resolve with standard aftercare. If the bar appears to be migrating toward the edge of your ear, consult a specialist immediately. Removing the jewelry early can prevent significant scarring and preserve the integrity of your cartilage for the future.


